Ingredients for - Rainbow Layer Cake
How to cook deliciously - Rainbow Layer Cake
1. Stage
Preheat the oven to 350°F: Lightly butter the bottom of six 8-inch cake pans and place an 8-inch round of parchment on the bottom. If you don’t have 6 cake pans, you’ll have to bake the layers in multiple rounds.
2. Stage
Combine the dry ingredients: In a large bowl, whisk together the flour, salt, and baking powder. Set aside.
3. Stage
Whisk the eggs: In a mixing bowl with a spout, whisk together the eggs, egg whites, and vanilla. Set aside.
4. Stage
Cream the butter and sugar: Add the room temperature butter and sugar to another mixing bowl. Mix on medium speed with the paddle attachment for 9 to 10 minutes until it looks white in color and fluffy.
5. Stage
Add in the whisked eggs and vanilla: With the mixer running on low, stream in the whisked eggs and vanilla. Turn off the mixer, scrape down the bowl with a rubber spatula. Mix one more time on low to ensure everything is well combined.
6. Stage
Alternate the dry and wet ingredients: Add a third of the dry ingredients to the mixing bowl and mix on low speed to combine. Then slowly stream in half of the buttermilk. Continue alternating dry and wet ingredients, ending on dry, until everything is combined. Scrape down the sides and bottom of the bowl well to make sure everything is incorporated then mix it one more time to make sure it’s well combined.
7. Stage
Distribute the batter: Evenly distribute the batter, about 1 1/2 cups (280g), into 6 medium sized bowls. Add one gel color to each bowl and use a spoon to mix the color into the batter. You will have yellow, blue, green, purple, orange, and red batters.
8. Stage
Bake the layers: Pour each bowl of colored batter into their own prepared cake pan. If you are baking in multiple batches, you can leave the other batter bowls uncovered on the counter until you are ready to bake them. Use a small offset spatula to spread the batter around to evenly fill each pan. Bake three pans at a time for 17 minutes until the tops spring back when touched and the cake starts to pull away from the sides of the pans.
9. Stage
Cool the layers: Allow each pan to cool on a wire rack for 5 minutes, then turn over each pan and remove the layers. They should fall right out with no problem. Let the layers cool completely on a wire rack. Repeat until all 6 cake layers are baked and cooled.
10. Stage
Beat the butter for buttercream frosting: In a stand mixing bowl fitted with the paddle attachment, or in a large mixing bowl with a hand mixer, beat the butter on medium speed until smooth, about 2 minutes.
11. Stage
Add powdered sugar: Add the powdered sugar. Mix on low speed until combined, then increase the speed to medium-high and continue mixing until white and fluffy, about 3 to 4 minutes.
12. Stage
Add milk and vanilla: Add the milk and vanilla. Mix on low speed until combined, then increase the speed to medium and mix again until fluffy, about 30 seconds.
13. Stage
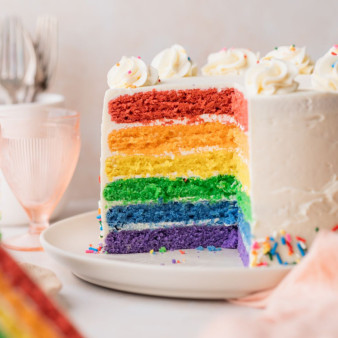
Apply a layer of frosting to the layers: Place the purple cake layer right side up on a large plate or cardboard cake round at least 2 inches larger than the cake. Use an offset spatula or butter knife to spread about 1/2 cup of the frosting evenly over the layer. Add the blue layer and spread another layer of frosting (about 1/2 cup). Continue this same pattern with the green, yellow, and orange layer. Top the last red cake layer up-side-down, so the top of the cake is smooth and flat. Make sure that the cake layers are centered, and the top of the cake is level.
14. Stage
Apply the crumb coat: Spread about 1 cup of frosting over the top and sides of the cake using an offset spatula or the straight edge of a large butter knife. Use the spatula to spread the frosting into a thin, even layer. You should be able to see the cake through the frosting.
15. Stage
Chill the cake: Place the cake, uncovered, in the freezer for 10 to 15 minutes or in the fridge for 20 to 30 minutes for the frosting to set.
16. Stage
Frost the cake: Remove the cake from the fridge or freezer. Spread a generous amount of frosting over the top and sides of the cake as before, this time leaving a thicker layer of frosting. Use the offset spatula or the back of a butter knife to smooth the sides. The freezer helps set the frosting quickly so that the sides and top are perfectly smooth!
17. Stage
Decorate the cake: Then hold the cake with one hand, and slightly tilt your hand and the cake so that you can gently press and drop the rainbow sprinkles along the bottom border of the cake. Use a piping bag with a large star tip to pipe 10 to 12 rosettes of buttercream along the top edge of the cake. Sprinkle the tops of the rosettes with the rainbow sprinkles.
18. Stage
Let cake chill before cutting: Let the cake chill in the freezer for 20 to 30 minutes, then use a hot sharp knife to cut perfectly clean slices.
19. Stage
Storage: Once the cake is assembled and decorated, it’s best to store it in the fridge until you are ready to eat it. I recommend pulling the whole cake out a few hours before cutting and serving to allow the cake to come back to room temperature which makes it easier to cut. Do you have extra slices that you want to store for later? One of my favorite tricks is to first place the leftover slices on a plate or baking tray and then freeze them for 10-15 minutes until solid. Then I wrap each slice twice in plastic wrap. Did you love this recipe? Give us some stars below!


